OverkillsharpTM Honing Method
The poor man's path towards sharpening perfection.
by Bob Strawn
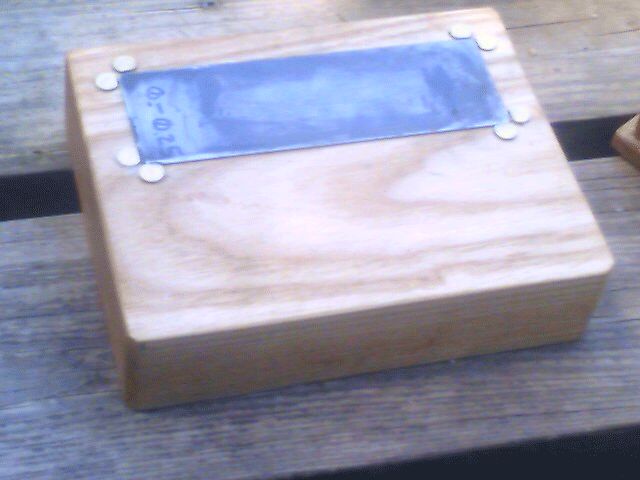 |
The steel plate has diamond grit imbedded into it. The diamonds on this plate are just under the size that is possible to see by an optical microscope. The plate is on a 2" thick slab of ash for stability. The plate is held in place by 1" long 1/4" diameter brass rods ground to the height of the plate. |
An Explanation of Grit:
For the sake of simplicity, a good reference for sharpness/dullness is 220 sandpaper. The CAMI and FEPA grit size is pretty much the same. You can put an edge on a tool or knife about like you get from the store and maybe better. Because grit size is an uneven scale, it is much easier to use microns as a reference of size. 220 grit is about 60 microns. Also for simplicity, one can consider using grits larger than 60 microns as shaping edges and using grits that are 60 microns or smaller as refining edges.
60 micron grit will almost give a mirror finish to steel, and will give a soft smooth finish to wood. Using, larger that 60 micron grit can make an edge that cuts, but with a magnifying glass the grooves in the steel can be seen. Just as a jagged edged board can make splinters and snag, a jagged edged blade will not hold edge as long and will not perform as reliably as a better refined edge.
Overkillsharp™ is all about refining edges by using abrasive powder. Sandpaper is abrasive glued to a substrate. Using powdered abrasive can be much less expensive. No glue, no special paper to replace. The abrasive is good until it is worn down. There is another advantage to using an abrasive powder. It is possible to obtain abrasives that are better graded.
As an example, the finest grit listed in this article is graded at 0 to 0.25 micron. Some sources would advertise that as 0.25 micron. More sources would advertise it as 0.2 micron, and most will advertise it as 0.1 micron. It is better to use the range of grit for terminology as it is more accurate. 0 to 20 micron grit is slower than 10 to 20 micron grit and does not produce a keener edge or finer surface. Yet the 0-20 micron grit is often called 10 micron grit while the 10 to 20 micron grit is often called 15 micron grit. Because tightly graded grit cuts faster, and average grit listings are quite likely to lead to mistakes, using a range is much better than using an average or even largest grit size.
Currently, diamond grit is one of the best available abrasives. The reason is that diamonds are really hard. Diamond is as hard to tool steel as tool steel is to sheet rock. There are several types of diamond grit available. Friable diamonds will break down and create finer and finer, really sharp particles. Less friable grits are preferred for diamond coated tools because they last longer. These directions are for creating a good range of diamond coated tools, so friable is not preferred.
Friable grit may be superior in many ways. They are however less predictable. Adding a friable grit as a finest grit would likely produce even keener edges without reducing the overall consistancy of this method.
| A Good Range of Grits For Honing | |||||
| Micron Range | FEPA Grit | CAMI Grit | JIS Waterstone | Mesh | Info |
| 40-60 | P280(50) | 240(50) | 280 (50) | 3 | General cleanup of rough edges. |
| 10-20 | P1200 (15) | 600(16) | 1000 (15) | 1200 | |
| 6-10 | P2000(6.5) | 1200(6.5) | 2000 (6.5) | 1800 | |
| 2-4 | F1200(3) | 1500(3) | 4000 (3) | 8000 | |
| 1-3 | F1500(2) | 1800 | 6000 (2) | ||
| 0-0.25 | 10000 (0.5) | Twice as fine as is advised for shaving. | |||
Purchasing Grit:
Diamond powder is available as a powder or in a suspension. When diamond dust is sold in water or grease, the measure is usually the total amount of fluid. When you buy the powder, the weight is the weight of actual abrasive. For this reason it is generally better to get the powder.
For convenience and economy however low concentrations are probably fine, too thick a concentration yields excess paste. Sellers may not be seriously hurting you by giving a premix with a lower concentration. A drop with just enough to be cloudy is more than enough tiny little sharp diamonds. It is possible that sellers add color to hide the fact that putting too much paste out is wasteful. The convenience of already having it mixed in an easy to dispense container is also worth considering. A bottle with distilled water and an eyedropper to thin and spread the mix can be very useful with high concentrations. Still, all things being equal, the best deal would be to buy the powder with a group of friends.
Here are a few sources:
- http://www.lascodiamond.com/products/dmdpdr.htm
- http://www.diamondtech.com/products/categories/diamond_powder_price_list.html
- http://www.smg-diamond.com/Table.html
- http://www.facetingmachines.com/polishes.shtml (has an amazing range of stuff and great information)
- http://www.toolsforworkingwood.com (on top of having great support, has one of the best online guides to hand sharpening)
- http://www.woodcarverssupply.com
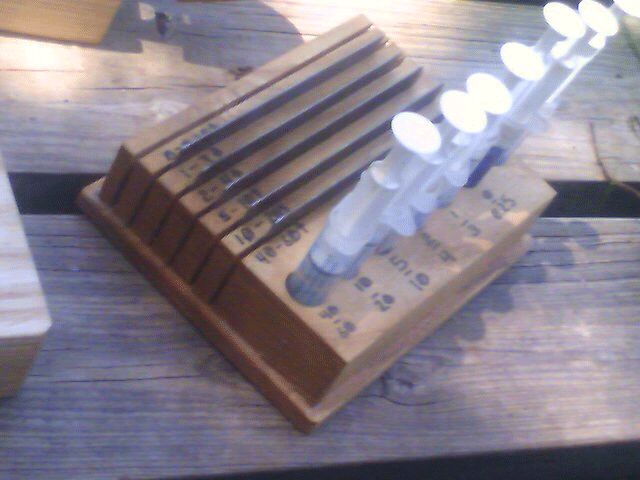 |
Six oral syringes with diamond dust suspended in water. One syringe with baby oil. Six metal plates, kept separate to prevent mixing grits. |
How to get set up:
Syringe Setup:
Oral syringes are available at most pharmacies. Obtain, at a minimum, one for each grit.
Before doing anything else lightly sand the side of a syringe with 1200 grit sandpaper, and then mark it with the grit size using a permanent marker.
Remove the cap and the plunger from the syringe and then put the cap back on. It is hard to measure small quantities like this, but try to pour about a drop of dust into the syringe. Put the plunger back in just a little so as to not build up too much pressure. Turn it over and shake the dust to the bottom.
Now you can remove the cap and push the plunger most of the way in. To get distilled water into the syringe a saucer can be filled and water sucked into the syringe. The syringes are more convenient if they are not all the way full. Leave a bit of air in the syringe as it will make it easier to shake up the mix. Put the cap back on and shake up the mix.
Color coding is not that important if you label the plates and syringes, but children's washable water colors are inexpensive and will do the job.Plate Setup:
Any reasonably thick metal plate that will resist deformation will do. The 2" wide,0.044 " thick steel strap they use to hold steel pipes down on trains is what I use. It is flexible on long straps, but cut down it is quite stiff. It does not seem to deform and once lapped into a clean flat plate, it is quite stable.
Sections from old table saw or circular saw blades should be superior. Steel that is softer than knife or tool steel is what has been tested so far with good results. Harder steel should be superior for honing, but less forgiving for mistakes.
Lap the plates to 440 grit. You can do this by gluing a sheet of sandpaper to MDF or glass. then by rubbing down the plate you will level the plate and put grooves in it that will help initially hold the grit in place. If there is a hard wax of paint layer on the plate, you do not need to totally remove it. Some professionals put hard wax on plates to initally help hold the grit into place. Over time, as you flatten the large flat backs of multiple tools, you will tend to further flatten and perfect your sharpening surface.
Initially the plates may seem to scrape up a bit when honing but over a few sharpenings it wears into what seems to be an ideal surface. Honing will tend to polishe and harden the plates. A solid wire edge can scratch the plate surface, in general this does little harm, but this can be mostly prevented by having a spare plate without any grit, or with your roughest grit, just to wear down wire edges with. As it gets scratched up, it becomes better for removing wire edges.
Mark clearly each plate front and back. Engraving would be nice; a good permanent marker on a spot you will not be using to sharpen will also do fine.
Sharpening:
- Line up a bunch of tools that are already shaped, clean, nick free and basically sharp.
- Shake up the syringe with a bit of air in it to mix up the dust and water.
- Uncap it, point it up and lose most of the air. Extra air can make the pressure variable as you squeeze out fluid, so it is harder to control the amount you use.
- Put out a drop or two. Pull touch of air in, cap it and put it away.
- Smear the drop around. Dilute with distilled water if it is too thick.
- As you start to sharpen, also try to spread and push the diamonds into the steel. Lapping the backs of tools is very good for doing this.
- Add a drop of baby oil to the surface to lubricate and lift old filings when it dries.
Notes:
- If the syringe gets close to empty and there is thick diamond slurry at the bottom, just suck up some extra distilled water.
- Remember to clean the tools well before you go to the next finer grit and plate. This will reduce the mixing of grits. Moving larger grits to finer plates will reduce your efficiency.
- After having used the plates for a while, and over time, lapped several coatings of diamond grit into the plates, the plates will tend to need charging with grit less and less often. It takes a while for diamond grit to wear down, but sheet rock does dull steel, so steel will dull diamond.
- No need to put out more diamond slurry until the metal stops rubbing off the tools you are sharpening. The plates can be washed clean with water. A plate can look like the steel plate has no diamond grit left on it and still cut tool steel.
- The diamonds will initially be driven into your tool steel as well as the plate you are lapping on. I suspect that one of the problems with this system is that you will carry some big grit to the finer grit plates no matter how careful you are about cleaning your tools. The large lone particles will tend to wear down first so over time this is self curing. It is possible that grinding cold and washing warm may help remove the looser bedded grit. The slurry can be left on the plate and when it dries, a few drops of drops of baby oil can be used to lubricate and protect the plate. The baby oil slurry seems to do the best sharpening.
- Even though you have not spent nearly enough time on a tool sharpening it, if the metal removed matches what you remove normally on another sharpening system, you are probably done with this grit for this tool.
- Keep an extra plate with the finest grit, to take with you and touch up the edge of tools while working.
Any suggestions, corrections, comments or flames should be sent to bob.strawn-remove-this-part-of -course-@gmail.com
The advice on this page is offered free and comes with no assurance of safety or accuracy.
Thanks are offered to Bernard LaVie for web page consulting.